Meta Description: Learn exactly how to record on FL Studio — audio, MIDI, automation, and clips. This complete step-by-step guide covers every recording method, gear setup, and pro tips for USA producers in 2026.
FL Studio is one of the most powerful digital audio workstations on the planet. Over 10 million producers worldwide use it daily — and a huge chunk of them are right here in the USA. From bedroom beatmakers to Grammy-winning artists, FL Studio powers some of the most iconic music ever made. But here’s the truth: recording audio in FL Studio confuses a lot of beginners. The interface looks complex. The options feel overwhelming. And one wrong setting means silence instead of sound.
Don’t worry. This guide fixes all of that. By the end, you’ll know exactly how to record on FL Studio — whether you’re tracking vocals, recording a guitar, capturing MIDI performances, or automating a filter sweep. Every method. Every setting. Every pro tip. All in one place.
“FL Studio is not just a beat-maker. It’s a full recording studio inside your computer.” — Image-Line
FL Studio records four types of data: audio, notes (MIDI), automation, and clips. Each type works differently. Each serves a unique purpose in your music production workflow. Choosing the right recording type for the right situation separates good producers from great ones. Let’s start from the very beginning and build your recording knowledge from the ground up.
FL Studio Edition Comparison — Which Version Supports Recording?
Before anything else, you need the right version of FL Studio. Not every edition supports full audio recording. Here’s a clear breakdown so you don’t waste money on the wrong version.
| FL Studio Edition | Audio Recording | MIDI Recording | Automation | Price (USD) |
| Fruity Edition | ❌ No | ✅ Yes | ✅ Yes | $99 |
| Producer Edition | ✅ Yes | ✅ Yes | ✅ Yes | $199 |
| Signature Bundle | ✅ Yes | ✅ Yes | ✅ Yes | $299 |
| All Plugins Edition | ✅ Yes | ✅ Yes | ✅ Yes | $499 |
Producer Edition is the sweet spot for most USA producers. It unlocks full FL Studio audio recording without breaking the bank. If you’re on Fruity Edition and wondering why you can’t record audio — this is exactly why. Upgrade to Producer Edition first.
Key Fact: FL Studio offers free lifetime updates. Pay once and get every future version free. No subscriptions. Ever.
Mac vs Windows — What’s Different for Recording?
FL Studio works on both Mac and Windows. But the recording setup differs depending on your operating system. Knowing this saves you hours of troubleshooting.
| Setting | Windows | Mac |
| Audio Driver | ASIO or ASIO4ALL | CoreAudio |
| Latency Performance | Excellent with ASIO | Excellent with CoreAudio |
| Driver Download | ASIO4ALL (free) | Built-in, no download needed |
| Setup Location | Options > Audio Settings | Options > Audio Settings |
| USB Mic Support | ✅ Yes | ✅ Yes |
| Audio Interface Support | ✅ Yes | ✅ Yes |
Windows users must use ASIO drivers for proper low-latency recording. The generic Windows audio driver causes terrible latency — sometimes 200ms or more. That makes recording feel completely broken. Mac users have it slightly easier. CoreAudio is built into macOS and works beautifully out of the box. Simply select it in FL Studio’s audio settings and you’re ready to go.
How to Record External and Internal Audio in FL Studio
FL Studio handles two completely different recording types. Understanding both changes everything about how you work inside the software.
External audio comes from the outside world — a microphone, an electric guitar, a bass, or any instrument plugged into your audio device inputs. This audio travels through your audio interface and into FL Studio via the Mixer. Internal audio comes from instruments already loaded inside FL Studio’s Channel Rack — synthesizers, drum machines, samplers, and virtual instruments. Internal audio never leaves your computer. It lives entirely within FL Studio’s digital environment.
External recording demands proper hardware. Internal recording demands proper routing. Both demand a solid, confident understanding of the FL Studio mixer track system. Without that foundation, recording becomes a frustrating guessing game. With it, recording becomes fast, repeatable, and professional every single time. Let’s build that foundation right now — starting with your gear.
What You Need Before Recording External Audio
Getting your gear right before you hit record is non-negotiable. The wrong setup doesn’t just sound bad — it produces no sound at all. Here’s exactly what every USA producer needs before starting their first FL Studio recording session.
The single most important piece of equipment is an audio interface. It’s the bridge between the physical world and your digital audio workstation. Your microphone or guitar plugs into it. It converts analog sound into digital data that FL Studio can process. Without an audio interface, your FL Studio microphone recording quality will be significantly limited. On Windows, FL Studio requires ASIO drivers for proper low-latency recording. Download ASIO4ALL for free if your interface doesn’t include its own dedicated ASIO driver.
| Gear | Recommended Option | Purpose | Approx. Price (USD) |
| Audio Interface | Focusrite Scarlett 2i2 | Connects mic/guitar to PC | $120 |
| Microphone | Shure SM58 / Blue Yeti | Captures vocals & instruments | $99–$129 |
| Cable | XLR / USB | Signal transfer | $10–$20 |
| Driver (Windows) | ASIO4ALL (free) | Reduces latency | Free |
| Driver (Mac) | CoreAudio (built-in) | Low-latency audio | Free |
| FL Studio Version | Producer Edition or higher | Enables full audio recording | $199 |
| Sample Rate | 44.1kHz | Studio-standard audio quality | — |
| Buffer Size | 128–256 samples | Balances latency and CPU load | — |
Set your buffer size between 128 and 256 samples inside FL Studio’s audio settings. Lower buffer size means less latency — better for recording. Higher buffer size means less CPU strain — better for mixing heavy projects. Find the sweet spot that works for your specific computer. Most modern laptops and desktops handle 128 samples without any issues whatsoever.
Using a USB Microphone or Headset
A USB microphone is the fastest, easiest way to start FL Studio microphone recording. No audio interface needed. No complex routing. No driver headaches. Just plug it into your USB port and FL Studio recognizes it almost instantly. Popular choices among USA producers include the Blue Yeti, HyperX QuadCast, and Razer Seiren — all excellent options for home studio recording.
Setting up a USB mic in FL Studio takes under two minutes. Go to Options > Audio Settings. Change your input device to your USB microphone. Close the settings window. That’s genuinely all there is to it. USB mics work brilliantly for vocals, podcasts, voice-overs, spoken word, and acoustic instrument recording in a treated room. They’re also perfect for bedroom producers working on a tight budget who want to start recording today rather than waiting until they can afford a full interface setup.
However, USB microphones do have real limitations worth understanding. They can’t match the dynamic range, warmth, or signal quality of a proper XLR microphone routed through a dedicated audio interface setup. They also can’t be used simultaneously with other microphones in a multi-mic setup. For beginners though, a USB mic is absolutely a fantastic, legitimate starting point. Don’t let the pursuit of perfect gear stop you from making music right now.
How to Record External Audio (Microphones, Guitars, etc.)
Recording external audio in FL Studio follows a specific sequence of steps. Every single step matters. Skip one and you’ll sit in silence wondering what went wrong. Follow this process carefully every time you set up a new recording session.
First, connect your microphone or guitar to your audio interface using the appropriate cable — XLR for microphones, quarter-inch TS or TRS for guitars and instruments. Then connect your interface to your computer via USB or Thunderbolt. Open FL Studio and press F9 to open the Mixer. Select a free Insert track on the left side of the Mixer. At the top of that track, click the input selector dropdown. Choose your interface input — typically labeled IN 1 for the first input or IN 2 for the second.
Next, arm that mixer track for recording. Look for the small circular record button on the mixer track itself. Click it so it illuminates. Now FL Studio actively listens to your input signal. Speak into your microphone or play a note on your guitar. Watch the level meter on that mixer track. Your input signal levels should peak between -12dB and -6dB during loud moments. If the meter hits 0dB or goes red, you’re clipping — lower your interface’s input gain knob immediately. Clipping permanently distorts your recording and can’t be fixed in post-production.
Pro Tip: Always use a pop filter when recording vocals. It eliminates harsh plosive sounds — the explosive “P,” “B,” and “T” sounds that overload microphone capsules. A simple foam or mesh pop filter costs under $15 and makes a dramatic difference in recording quality.
FL Studio Recording Methods — Step by Step
FL Studio offers three fundamentally different methods for recording audio. Each method suits a different workflow, a different skill level, and a different creative goal. Picking the right method before you start recording saves significant time and produces dramatically better results.
| Method | Best For | Difficulty Level | When to Use |
| Playlist Recording | Live vocals, instruments, real-time tracking | Beginner | Building arrangements directly |
| Edison Recording | Sampling, detailed editing, loop creation | Intermediate | When you need post-recording editing |
| Mixer Track Freezing | Internal sounds, CPU-heavy projects | Advanced | Freeing up CPU on complex projects |
Most professional producers use all three methods regularly. They switch between them depending on what the project demands at that specific moment. A vocalist might use Playlist recording for tracking. A sound designer might use Edison for sampling. A producer with a CPU-heavy project might freeze tracks constantly. Mastering all three makes you genuinely versatile inside FL Studio.
1. Playlist Recording Procedure
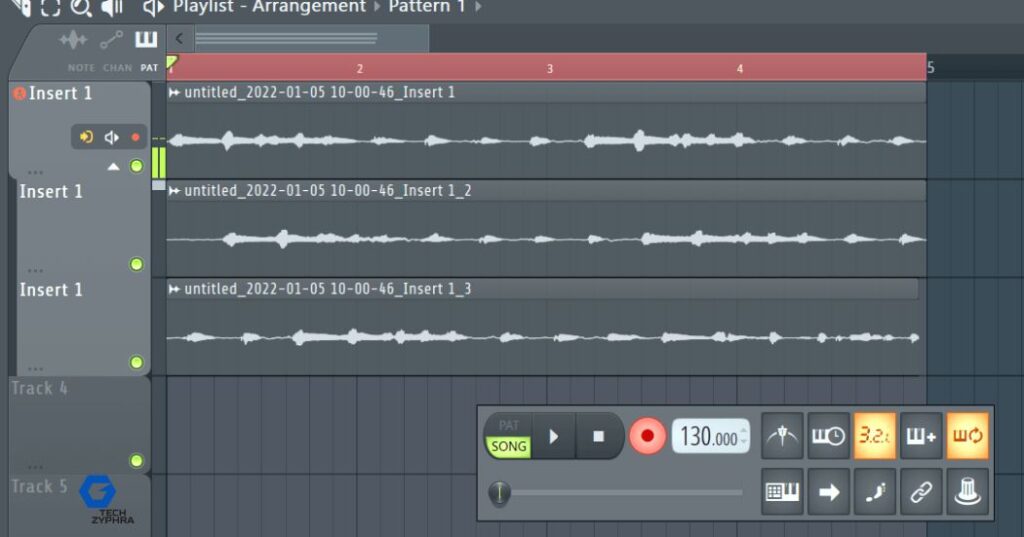
Playlist recording in FL Studio is the most direct, beginner-friendly recording method available. It records audio straight into your arrangement timeline — exactly like recording onto a physical tape machine. What you play goes directly into the Playlist as an audio clip, positioned exactly where your playhead sits. No extra steps. No dragging files around. Instant results.
Start by pressing F5 to open the Playlist. Right-click the record button on the Main Transport Panel at the top of your screen. This opens the Recording filter — FL Studio’s menu for choosing what data type to record. Select “Audio, into the Playlist as an audio clip.” Make sure your mixer track input is armed as described earlier. Press the record button — or use the keyboard shortcut — and start performing. FL Studio captures your audio in real time with zero processing delay if your ASIO driver is configured correctly.
When you stop recording, your clip appears instantly in the Playlist timeline. You can immediately drag it to a different position, trim its edges, or duplicate it across the arrangement. This visual, immediate feedback is exactly why beginners love Playlist recording — you see your performance materialize in front of you the moment you finish playing. FL Studio audio recording into the Playlist is genuinely the fastest path from performance to arrangement.
Playlist Loop Recording
Loop recording elevates Playlist recording from basic to professional. Instead of recording one take and moving on, loop recording lets you record the same section repeatedly. FL Studio stacks every take automatically. You review them all afterward and choose the best performance — exactly like professional vocal comping in any major recording studio.
Enable loop recording by activating the loop button in the transport bar. Set your loop start and end points directly on the Playlist timeline — drag the timeline markers to define exactly which bars you want to loop. Hit record and perform your part continuously. Each pass through the loop creates a completely new take. After recording five or ten takes, right-click your recorded clip to access the take browser. Audition each take individually. Select the best one. Label it clearly with a descriptive name so your session stays organized as it grows in complexity.
2. How to Record Using Edison in FL Studio
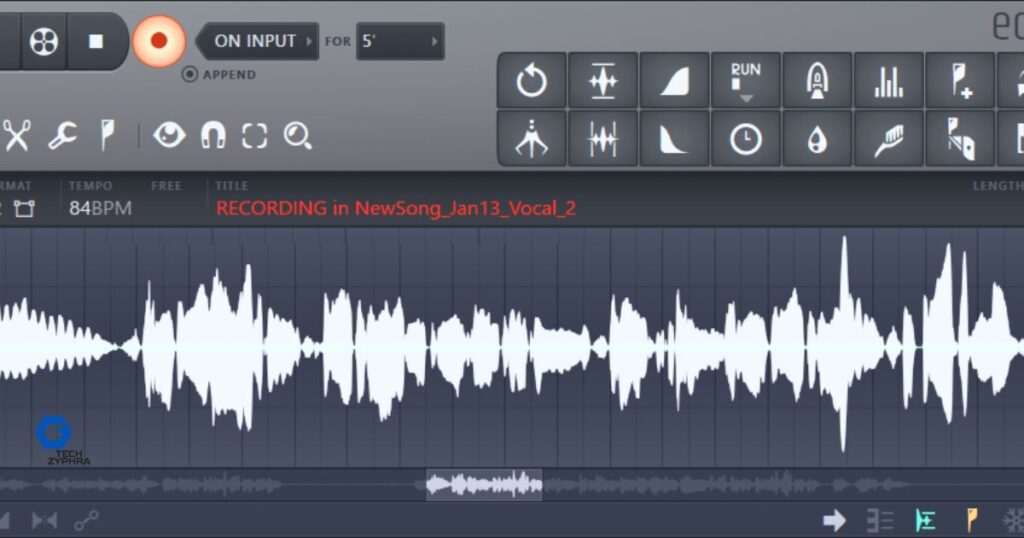
Edison is FL Studio’s professional-grade built-in audio recorder and editor. Unlike Playlist recording, Edison doesn’t drop clips directly into your arrangement. Instead, it captures audio with a full suite of editing tools immediately available after recording. Trim unwanted silence. Normalize levels. Remove noise. Cut sections. All inside Edison before your audio ever touches the Playlist. This makes Edison the preferred recording method for producers who want maximum control over their recorded material.
To use Edison, press F9 to open the Mixer. Click an empty insert slot on your chosen mixer track. From the plugin selector, load Edison. Its interface appears as a floating window. Before recording, set your desired recording format and quality inside Edison’s settings. Click the red record button inside Edison’s toolbar — it arms Edison and puts it in a waiting state. Press play on FL Studio’s main transport. Edison immediately begins capturing every sound passing through that mixer track — from your microphone, your instrument, or any internal FL Studio instrument loaded on that channel.
After recording stops, Edison displays your captured audio as a detailed waveform. Use Edison’s built-in tools to clean up your recording immediately. When the edit is complete, drag the waveform from Edison directly into your Playlist. It lands as a clean, trimmed, perfectly edited audio clip ready for arrangement. Edison FL Studio recording is the professional choice for anyone serious about audio quality and post-recording control.
Edison Loop Recording
Edison’s loop recording mode works with surgical precision. Open Edison and click the loop recording icon in the toolbar. Set your exact loop length — either in musical bars aligned to your project tempo or in precise seconds for sample-accurate control. Once armed, Edison records continuously and loops back to the start point automatically after each pass.
Each loop pass gives you a choice. You can overdub — layering new audio on top of existing recorded material — or replace the previous take with your new performance. Overdubbing works beautifully for building up drum patterns, layering vocal harmonies, or stacking instrument parts one at a time. Replace mode works better when you want multiple clean, separate takes to choose from. When your loop recording session finishes, export the result directly to your Playlist as a polished audio clip or save it as a standalone WAV file to your sample library.
3. Recording Internal Mixer Audio (Freezing Mixer Tracks)
Recording internal audio in FL Studio solves one of modern music production’s most persistent problems: CPU overload. As your projects grow — more synthesizers, more effects, more layers — your computer’s processor strains harder and harder to calculate everything in real time. Latency increases. Crackling appears. Playback stutters. Freezing mixer tracks is the professional solution to all of these problems simultaneously.
Freezing a mixer track renders that track’s audio — including all its plugins and effects — into a static audio file. Your CPU no longer needs to calculate that track’s processing in real time during playback. The frozen track plays back as lightweight audio instead of demanding live plugin computation. The sonic result is completely identical to the original. Nobody listening can tell the difference. Professional producers working on complex, plugin-heavy arrangements freeze tracks constantly throughout their workflow. It’s one of the most powerful — and most underused — features in FL Studio.
Non-Realtime Recording Playlist (Mixer Track Freezing)
Non-realtime freezing is FL Studio’s fastest rendering method. Right-click the mixer track you want to freeze inside the Mixer. Select “Freeze track” from the context menu. FL Studio renders that track faster than real time — often completing a four-bar loop in under a second. The track becomes a lightweight audio file. Your CPU usage meter drops visibly and immediately.
The beauty of non-realtime freezing is its complete reversibility. Right-click the frozen track anytime and select “Unfreeze.” FL Studio restores all original plugins, settings, and automation exactly as they were before freezing. Nothing is lost. Nothing changes. You can freeze, unfreeze, edit, and re-freeze as many times as needed throughout your session. Use non-realtime freezing aggressively on any track running heavy VST synthesizers, complex multi-band effects chains, or CPU-intensive convolution reverbs.
Realtime Recording with Edison & Playlist
Realtime recording with Edison captures your complete mix exactly as it sounds during live playback. Load Edison on the Master mixer track — the final output track that receives every other track’s audio. Arm Edison for recording. Press play on FL Studio’s transport. Edison records everything: every instrument, every effect, every automation movement, every dynamic change — precisely as you hear it through your monitors or headphones.
This method works perfectly for capturing live performance sessions, recording full arrangement bounces for client feedback, or creating a high-quality mix reference before beginning the mastering process. Combine realtime Edison recording with active Playlist clip triggering for a genuinely exciting live performance capture workflow. Keep your buffer size as low as your computer comfortably handles during realtime recording sessions. Higher buffer sizes introduce timing offsets that can make recorded audio land slightly late relative to the arrangement grid.
FL Studio Mixer Setup & Reference Guide
The FL Studio mixer setup is the central nervous system of your entire recording workflow. Every audio signal — internal or external — passes through the Mixer at some point. Understanding its architecture completely transforms your recordings from rough and unprofessional to clean and studio-ready. Open the Mixer at any time by pressing F9.
The Mixer organizes into three distinct sections working together. Insert tracks handle individual instruments, vocals, and audio sources — each on its own dedicated channel with its own effects chain. Send tracks manage shared effects processors — a reverb room that multiple instruments share, or a parallel compression bus receiving signals from several channels simultaneously. The Master track receives the summed output of every other track and hosts your final limiting and mastering plugins before the signal reaches your speakers or headphone amplifier.
| Mixer Section | Function | Common Use |
| Insert Tracks | Individual instrument/vocal channels | Vocals, guitars, synths |
| Send Tracks | Shared effects buses | Reverb, delay, parallel compression |
| Master Track | Final output — overall volume control | Limiting, mastering, final EQ |
| Input Selector | Choose your audio interface input | Mic, line-in, instrument |
| Output Selector | Route audio to headphones or monitors | Monitoring, headphone mixes |
| Insert Slots | Add effects plugins per channel | EQ, compression, saturation |
| Track Volume Fader | Control individual track levels | Balancing the mix |
| Track Pan Knob | Position audio in stereo field | Stereo width, panning |
Proper mixer input/output routing is the foundation of clean, organized, professional recordings. Route every instrument to its own dedicated Insert track. Never pile multiple unrelated instruments onto the same mixer channel — it destroys your ability to mix and process them independently. Add your EQ and compression plugins on each channel’s insert slots. Reserve your Master track for final output processing only. This disciplined routing approach mirrors exactly how professional recording studios have organized their analog mixing consoles for decades.
Common Recording Mistakes & How to Fix Them
Every producer makes recording mistakes. Absolute beginners make them constantly. Seasoned professionals make them occasionally. The critical difference isn’t avoiding mistakes entirely — it’s recognizing them instantly and knowing exactly how to fix them without losing momentum or wasting session time.
The single most frustrating mistake is recording complete silence. You perform your best take, stop the recording, and find an empty waveform in your Playlist. This almost always means your mixer track input isn’t armed — that small circular button on the mixer track wasn’t activated before recording began. Check it first, every single time, without exception. The second most common issue is audio clipping — your recorded waveform appears crushed flat at the top, indicating the input signal exceeded 0dB and got digitally distorted. Lower your audio interface’s input gain knob and re-record. Clipping cannot be repaired in post-production.
| Mistake | Root Cause | Professional Fix |
| No sound recorded | Mixer input not armed | Arm the mixer track before every session |
| Audio clipping/distortion | Input gain set too high | Lower gain, target peaks at -6dB |
| Latency/timing issues | Wrong driver or high buffer size | Switch to ASIO, lower buffer to 128–256 |
| Hollow, thin sound | Phase issues or poor room acoustics | Check mic polarity, treat recording room |
| Can’t hear yourself monitoring | Input monitoring disabled | Enable monitoring button on mixer track |
| Recording file not saving | Incorrect audio recording path | Set correct path in FL Studio settings |
| Crackling and dropout audio | CPU overload during recording | Freeze unused tracks, raise buffer size |
| Timing feels slightly off | Latency compensation not enabled | Enable Mixer Latency Compensation |
| Noise and hum in recording | Ground loop or cable issue | Use balanced XLR cables, check grounding |
Run through this checklist before every single recording session. A disciplined five-minute pre-session check prevents hours of post-session frustration. Professional FL Studio audio recording always begins with a verified, problem-free technical setup — not with immediately pressing record the moment inspiration strikes.
Real Producer Case Study — From Bedroom to Billboard
Understanding how real producers use FL Studio for recording makes these techniques tangible and relatable. Consider the workflow of Metro Boomin — one of America’s most celebrated hip-hop producers, a longtime FL Studio user who built an entire career on the platform. Metro doesn’t just use FL Studio for beats. He uses it for sampling, recording live vocal sessions, capturing melodic references, and building complex layered arrangements entirely within the software.
His approach mirrors the exact workflow this guide teaches. He routes every element through dedicated mixer tracks. He uses Edison for capturing samples and manipulating audio at the waveform level. He automates effects in real time to create the dynamic, evolving soundscapes his productions are famous for. He manages CPU load strategically by freezing completed elements while continuing to build new layers on top.
“The process matters as much as the talent. A clean, organized session is a productive session.” — Studio production wisdom embraced by top-tier producers globally.
You don’t need Metro Boomin’s budget or connections. You need his discipline. Organize your sessions. Route your mixer properly. Label every track. Fix problems before recording rather than after. These habits separate producers who improve rapidly from those who stay stuck at the same level for years.
Recording Audio, Scores & Automation — Complete Overview
FL Studio records four completely distinct types of data. Most beginners only discover audio recording and stop there. But notes recording, automation recording, and clip recording are equally powerful creative tools. Together, these four recording types give you absolute, total creative control over every dimension of your music production.
Access all four recording types through the Recording filter. Right-click the record button on the Main Transport Panel at the top of FL Studio’s interface. A menu appears showing every available recording type. Select one or multiple types simultaneously depending on your current creative need. Understanding each type at a deep level — not just a surface level — transforms you from a basic FL Studio user into a genuinely complete, capable producer.
Recording Audio (Mixer, Line-In, Microphone)
FL Studio audio recording captures sound from two distinct source categories. Internal sources generate audio inside FL Studio — synthesizers, drum machines, samplers, and virtual instruments loaded in the Channel Rack. External sources bring audio into FL Studio from the physical world — your microphone input, your guitar through a line-in jack, or any instrument connected through your audio device inputs. Both categories route their signal through the Mixer before being recorded.
For line-in recording, connect your electric guitar, bass, or keyboard directly to your audio interface’s line-level input. Set the corresponding mixer track’s input selector to match that interface channel. Arm the track. Adjust your input gain for proper levels — peaks targeting between -12dB and -6dB for clean, dynamic, undistorted recordings. This target range gives your recordings sufficient headroom for mixing and mastering processing without any risk of digital clipping destroying your takes.
Recording Notes (Scores / Keyboard Performances)
Recording MIDI in FL Studio captures your keyboard performances as pure note data rather than audio. This distinction is enormously powerful. Recorded note data remains completely editable after the performance ends. Change any individual note’s pitch, timing, velocity, duration, or position in the Piano Roll anytime — even years after the original recording session. Audio recordings are fixed the moment they’re captured. MIDI recordings remain infinitely flexible forever.
Connect your external MIDI keyboard or MIDI pad controller to your computer via USB. FL Studio detects most modern MIDI devices automatically upon connection. Navigate to Options > MIDI Settings to verify detection and enable your specific device. With your device enabled, open any instrument plugin in the Channel Rack. Arm the recording filter for notes. Hit record on the main transport and play your performance. Every note, every velocity nuance, every timing subtlety gets captured with complete accuracy inside the Piano Roll.
The Score Logger deserves special attention — it’s one of FL Studio’s most genuinely brilliant hidden features. It maintains a continuous 3-minute rolling buffer of all note activity from every external controller and keyboard connected to FL Studio. This means even when you forgot to press record, your performance wasn’t lost. Navigate to Tools > Score Logger immediately after your unrecorded performance. Your entire playing session sits there waiting, preserved perfectly within that three-minute window.
Step entry editing provides a completely different approach to note recording for producers who aren’t confident live keyboard performers. Instead of playing notes in real time, you enter them one at a time at your own deliberate pace — no timing pressure, no performance anxiety, no mistakes from rushed fingers. Access step entry mode directly inside the Piano Roll editor. Build extraordinarily complex melodies, chord progressions, and rhythmic patterns one perfectly placed note at a time.
Recording Automation (Controller Changes)
FL Studio automation recording captures every movement you make on any knob, slider, button, or control within FL Studio or its plugins. Volume fades that rise gradually over sixteen bars. Filter sweeps that open dramatically into a chorus. Reverb depth that swells beneath a bridge section. Delay feedback that increases through a breakdown. All of it gets recorded as dynamic, editable automation data stored in automation clips within your Playlist.
To record automation, right-click the record button and activate “Automation” in the Recording filter. Right-click any knob, fader, or control anywhere in FL Studio’s interface — including third-party VST plugins — and select “Link to controller.” Now move that control during playback. FL Studio records every subtle movement as a smooth automation clip that appears automatically in your Playlist timeline. Open the Automation Clip Editor afterward to refine every curve point with mathematical precision if the live recording wasn’t perfectly smooth.
The creative applications for recording continuous controller changes are genuinely limitless. Automate a low-pass filter opening precisely at your track’s drop for that spine-tingling build-and-release tension. Record a reverb pre-delay change that shifts the perceived distance of a vocal between verses and choruses. Sweep a distortion drive control during an instrumental break for dramatic tonal transformation. Every one of these movements, recorded live with genuine musical feel, adds the kind of organic, human dynamism that separates professional productions from sterile, static mixes.
Recording Clips (Performance Mode)
Performance Mode transforms FL Studio from a traditional linear DAW into a dynamic, clip-based live performance instrument — similar conceptually to Ableton Live’s Session View, but with FL Studio’s distinctive workflow and character. In Performance Mode, you trigger individual clips — pattern clips, audio clips, and automation clips — in real time using your mouse, keyboard, or an external MIDI controller. FL Studio can record every clip trigger, every timing decision, and every creative choice you make during that live performance session.
Enter Performance Mode by clicking the performance mode button inside the Playlist toolbar — it’s the button that looks like a play symbol with a grid. Your Playlist transforms into a clip launcher. Assign clips to individual cells. Begin your performance, triggering clips according to your creative instincts in real time. FL Studio records precisely which clips you trigger and exactly when you trigger them. When your performance ends, FL Studio writes the entire recorded session into your Playlist as a complete, linear arrangement — ready for further editing, mixing, and refinement.
This workflow is enormously popular among live electronic music performers, DJ-producers, and hybrid live artists across the USA. It captures the spontaneous creative energy of a live improvisational performance while simultaneously producing an editable arrangement that can be refined in post-production. Recording clips in Performance Mode bridges the gap between the unpredictability of live music and the precision of studio production more elegantly than almost any other workflow in modern music production software.
How to Reduce Latency While Recording
Latency is the time delay between the moment you make a sound and the moment you hear it through your headphones or monitors. Even a delay as small as 20 milliseconds feels profoundly unnatural to trained human ears. It destroys your timing feel, makes confident performing nearly impossible, and turns what should be an inspiring recording session into a frustrating technical exercise. Eliminating latency is not optional for serious FL Studio audio recording — it’s absolutely essential.
The single highest-impact fix is switching to a proper ASIO driver on Windows. Open Options > Audio Settings inside FL Studio. Change your audio driver from whatever generic Windows driver is currently selected to either your audio interface’s dedicated ASIO driver — which came with the interface — or ASIO4ALL if no dedicated driver exists. Your latency will plummet immediately and dramatically. A typical improvement goes from 150–200ms with generic Windows drivers down to 5–15ms with ASIO — a transformation so significant it feels like a completely different program.
After switching drivers, reduce your buffer size progressively. Start at 256 samples and test for audio crackling or dropout during playback. If your audio sounds clean, drop to 128 samples and test again. Some powerful modern computers can handle 64 samples without issues, though 128 is the reliable standard for most mid-range USA producer setups. Additionally, disable every plugin and effect not actively needed during the recording take. Heavy convolution reverbs, CPU-intensive synthesizers, and complex multi-band processors all contribute to increased latency even with ASIO drivers properly configured.
Direct monitoring on your audio interface eliminates monitoring latency entirely by bypassing FL Studio’s processing chain for the monitoring signal. Your microphone or instrument signal travels directly from the interface input to your headphone output — completely independently of FL Studio. Zero processing. Zero delay. Pure, instantaneous sound. Every major audio interface designed for home studio use — including the entire Focusrite Scarlett lineup that dominates the USA home studio market — includes a dedicated direct monitoring control on the front panel. Engage it during every recording session without exception.
FL Studio’s Mixer Latency Compensation handles the remaining technical challenge automatically. Different plugins introduce different amounts of processing delay — called plugin delay compensation or PDC. Without automatic compensation, tracks using heavy plugins would land slightly late relative to tracks using no plugins, creating subtle but audible timing misalignments across your mix. FL Studio’s latency compensation system measures each plugin’s delay precisely and shifts the audio in those tracks forward in time by exactly the right amount to keep everything perfectly synchronized. Enable it in your Mixer settings and let FL Studio manage the technical complexity silently and automatically while you focus entirely on the creative work.
Key Takeaways — What You Learned Today
| Topic | Key Point |
| FL Studio Editions | Producer Edition or higher required for audio recording |
| Windows Setup | ASIO drivers mandatory for low-latency recording |
| Mac Setup | CoreAudio built-in — no extra driver needed |
| External Recording | Audio interface + armed mixer track + ASIO = clean recording |
| Playlist Recording | Fastest method — direct to arrangement timeline |
| Edison Recording | Most powerful — full editing tools immediately available |
| Mixer Freezing | Best for CPU relief on heavy projects |
| MIDI Recording | Infinitely editable — always prefer MIDI over audio when possible |
| Automation Recording | Captures live control movements as editable automation clips |
| Performance Mode | Records live clip triggering sessions as complete arrangements |
| Latency Fix | ASIO driver + low buffer size + direct monitoring |
| Score Logger | Saves 3 minutes of unrecorded MIDI automatically |
Frequently Asked Questions (FAQ)
Q: Can FL Studio record audio for free? No. The free trial version of FL Studio does not support saving projects, and the Fruity Edition doesn’t support audio recording. You need the Producer Edition ($199) or higher to record external audio. However, FL Studio offers a fully functional free trial — you just can’t save projects until you purchase a license.
Q: How do I record my voice on FL Studio? Connect a microphone to your computer — either directly via USB or through an audio interface via XLR. Open the Mixer (F9), select an Insert track, set the input to your microphone, arm the track for recording, right-click the record button to select audio recording mode, and press record. Your voice will be captured directly into the Playlist.
Q: Why is there no sound when I record in FL Studio? The most common cause is a mixer track that isn’t armed for recording. Check that the record button on your chosen mixer track is illuminated. Also verify your audio interface is selected correctly in Options > Audio Settings and that your ASIO driver is active on Windows.
Q: What’s the difference between recording in Edison vs the Playlist? Playlist recording drops audio clips directly into your arrangement timeline — fast and visual, ideal for beginners. Edison recording captures audio inside a dedicated editor with full waveform editing tools — more powerful, preferred by intermediate and advanced producers who need to edit audio before placing it in the arrangement.
Q: How do I reduce latency in FL Studio? Switch to an ASIO driver in Options > Audio Settings, lower your buffer size to 128–256 samples, enable direct monitoring on your audio interface, and disable any unused plugins during recording. These four steps combined will reduce latency to under 15ms on virtually any modern computer.
Q: Does FL Studio work with any microphone? Yes — FL Studio works with USB microphones (plug-and-play) and XLR microphones (require an audio interface). USB mics are easier to set up. XLR mics through a quality audio interface deliver significantly better sound quality for serious recording work.
Q: Can I record guitar directly into FL Studio? Absolutely. Connect your guitar to your audio interface’s instrument input (Hi-Z input), route it through a Mixer track in FL Studio, arm the track, and record. You can then add amp simulation plugins like Amplitube or Neural DSP directly on that mixer track to shape your guitar tone digitally.
Conclusion
Now you know exactly how to record on FL Studio — completely, professionally, and confidently. You understand the gear requirements, the Mac vs Windows differences, the three recording methods, the four data types, the mixer routing architecture, the common mistakes and their fixes, and the latency elimination techniques that separate frustrating sessions from productive ones.
FL Studio is an extraordinarily deep tool. Its recording capabilities rival professional hardware studio setups that cost tens of thousands of dollars. The Producer Edition costs $199 and gives you lifetime free updates — arguably the best value proposition in the entire music software industry. Your investment in learning this platform pays creative dividends for the rest of your production career.
Start simple. Plug in your microphone. Open the Mixer. Arm one track. Hit record. Make something. Then come back to this guide and learn the next technique. Build your knowledge methodically, one session at a time. Every professional producer you admire started exactly where you’re standing right now — in front of a screen, slightly confused, and completely excited about the music they’re about to make.
The gear matters less than you believe. The workflow matters more than you realize. Master FL Studio audio recording step by deliberate step and your music will improve in ways that consistently surprise you. Now close this guide, open FL Studio, and start recording — your best track hasn’t been made yet.