If your beat sounds empty, hi hat rolls might be the missing piece. Every great trap or hip-hop track has tight, crisp hi hat rolls driving the energy forward. FL Studio makes it surprisingly easy once you know where to look. This guide breaks down exactly how to do hi hat rolls in FL Studio using three proven methods. Whether you’re a beginner or intermediate producer, you’ll walk away with real skills you can use today. From closed hi hat selection to pitch automation — everything is covered right here.
What Are Hi Hat Rolls in FL Studio?
Hi hat rolls are rapid, repeated hi hat hits that add speed and tension to your beat. Think of them like a drum fill — but for hi hats. They show up everywhere in trap, drill, and hip hop drum patterns. A roll pushes notes closer together, creating a rushing, energetic feel that builds momentum inside your track. Without rolls, even a well-made beat can feel static and predictable. Rolls are what give a track that forward-moving, breathless energy that keeps listeners locked in from start to finish.
Drum programming FL Studio gives you full control over every single hit. FL Studio lets you place notes exactly where you want them. You control the speed, the volume, and the timing of every roll. That’s what makes it so powerful for FL Studio beat making. Unlike hardware drum machines, FL Studio lets you zoom in and edit each note individually — making your rolls cleaner and more precise than ever. Producers across the USA rely on FL Studio daily because of this level of control and flexibility inside the DAW.
“FL Studio’s Piano Roll is hands down the most powerful drum programming environment available to modern producers today.” — Common sentiment among professional beatmakers
How to Do Hi Hat Rolls in FL Studio – 3 Easy Methods
There are three solid ways to create hi hat rolls inside FL Studio. Each method works differently and suits different production workflows. The Piano Roll notes method gives you the most control and precision. The Step Sequencer FL Studio method is fast and beginner-friendly. The velocity method adds feel, life, and dynamics to your patterns. Knowing all three makes you a more flexible and well-rounded producer — you simply pick the right tool for the right moment depending on your workflow and creative needs.
Before jumping into each method, make sure your hi hat sample is already loaded into a channel. Open your mixer, set your BPM, and get your project ready. Good hi hat sample selection matters enormously here. A clean, sharp closed hi hat cuts through the mix far better than a muddy or washy sample. Pick something bright and short for the best results. The cleaner your sample is at the source, the tighter and more professional your rolls will sound once everything is in place inside your session.
Method 1: Creating Hi Hat Rolls in the Piano Roll
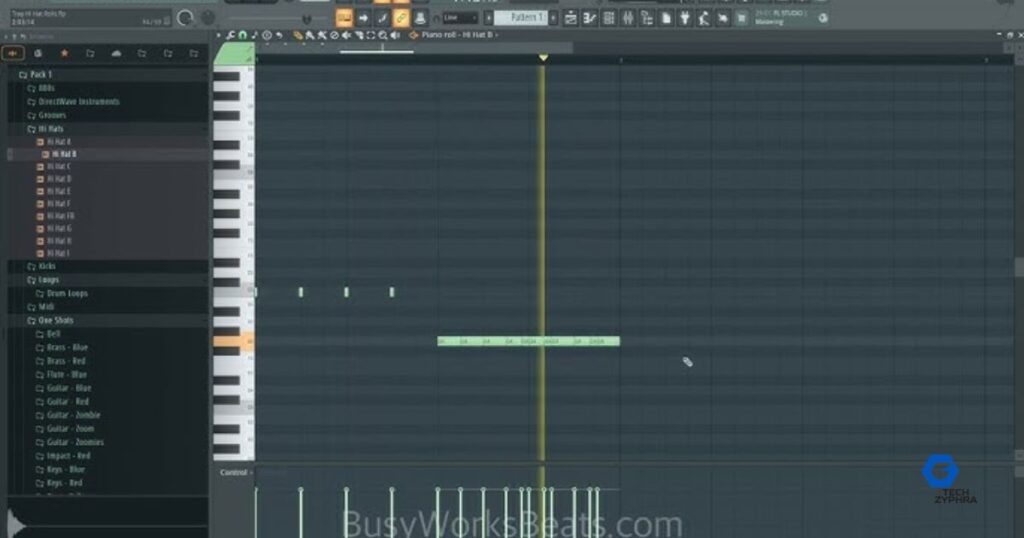
The Piano Roll is the most precise way to build hi hat rolls in FL Studio. Open your hi hat channel and press F7 to launch the Piano Roll. From here, you draw notes directly onto the grid. Shorter notes create faster rolls. Longer notes create slower, more relaxed patterns. This is your main workspace for serious hi hat roll tutorial work — and once you get comfortable here, your rolls will sound incredibly tight, clean and professional every single time you sit down to make a beat.
Here is a clear step-by-step process to follow inside the Piano Roll:
- Open the Piano Roll for your hi hat channel by pressing F7
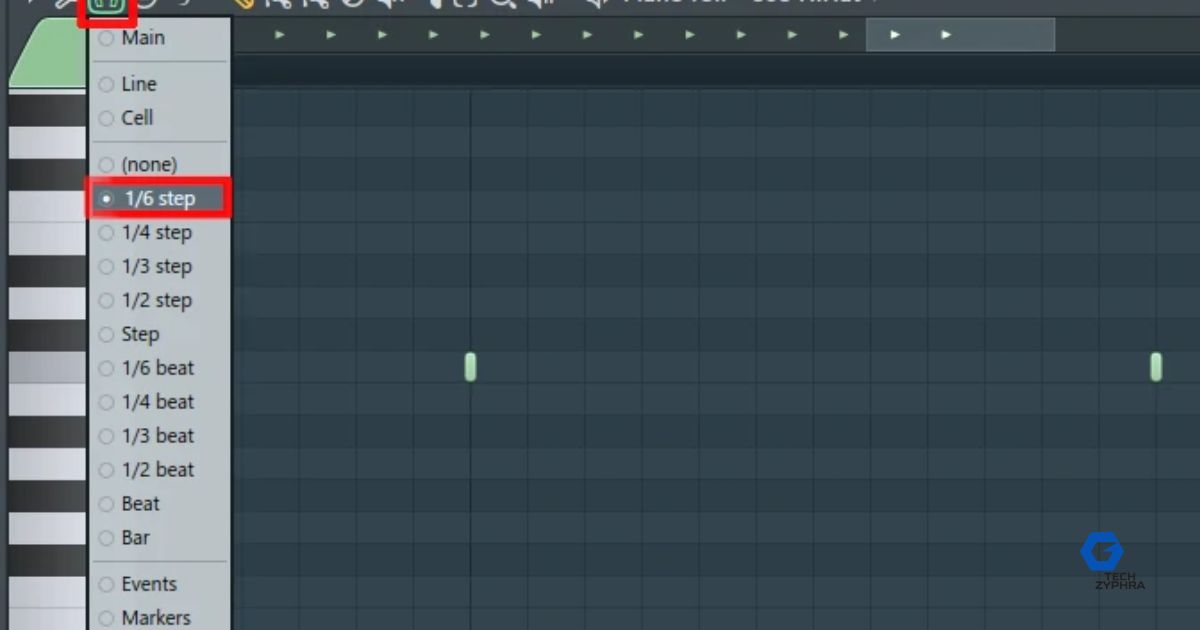
- Set the snap grid FL Studio to 1/32 or 1/64 for fast rolls
- Draw repeating short notes across the bar in a consistent pattern
- Select all notes and carefully adjust their length using note length FL Studio settings
- Open the velocity editor at the bottom and shape your note dynamics carefully
- Press play and listen back — adjust note spacing until the roll feels natural and right
Pro Tip: Start with 1/32 notes for a standard roll. Switch to 1/64 for ultra-fast trap-style rolls that hit hard on drops and transitions.
| Note Value | Roll Speed | Best Use Case |
| 1/16 | Slow | Groovy laid-back patterns |
| 1/32 | Medium | Standard trap rolls |
| 1/64 | Fast | Intense fills and pre-drop builds |
| 1/128 | Extreme | Build-ups, risers and special effects |
The Piano Roll also gives you the ability to zoom in extremely close on your notes. This level of detail is what separates amateur rolls from professional ones. When you zoom in, you can see tiny timing differences between notes and correct them manually. This micro-editing capability inside the snap grid FL Studio environment is one reason why FL Studio remains the top choice for trap and drill producers across the United States. Take your time here — patience inside the Piano Roll always pays off in the final mix.
Method 2: Using the Step Sequencer for Hi Hat Rolls
The Step Sequencer FL Studio is the fastest way to get a roll going quickly during a creative session. It’s the grid you see when you first open a beat pattern inside FL Studio. Each button represents a 1/16 note by default. You can right-click any step button to change its beat division to smaller values like 1/32 or 1/64. This instantly creates a roll without even touching the Piano Roll — saving you valuable time and keeping your creative momentum flowing during a productive session.
To make a roll in the Step Sequencer, right-click on a step and select your preferred note division from the menu. Then activate multiple steps in a row to build the roll pattern across the bar. Use quantization FL Studio settings to keep everything locked in time and perfectly in sync with your other elements. The Step Sequencer doesn’t give you as much granular detail as the Piano Roll — but it’s incredibly fast and intuitive. Many professional producers across the USA use this method to quickly sketch out trap beat FL Studio ideas before refining and polishing them later in the Piano Roll for final arrangement.
| Step Sequencer Setting | Result | Recommended For |
| 1/16 default | Basic groove pattern | Beginners |
| 1/32 division | Medium speed roll | Intermediate producers |
| 1/64 division | Fast trap roll | Advanced trap beats |
| Mixed divisions | Dynamic pattern | Professional arrangements |
Method 3: Using Velocity for Fast Hi Hat Rolls
Velocity editing is what makes your hi hat rolls feel genuinely alive and human. Velocity controls how hard each note hits during playback. A completely flat velocity line sounds robotic, lifeless and immediately recognizable as computer-generated. But when you carefully shape the velocity — starting low and gradually building high — your roll suddenly develops real energy, emotion and forward momentum. This is one of the most underused tricks in all of drum programming FL Studio and it makes an enormous difference to the overall quality and feel of your sound.
Open the velocity editor at the bottom of your Piano Roll by clicking the small arrow at the bottom left of the window. You’ll see vertical bars representing each individual note’s hit strength. Drag them up or down to change each hit’s intensity. For a crescendo roll, start with low velocities on the left side and steadily increase them toward the right. Use ghost notes — very low velocity hits placed between your main hits — to add subtle texture and movement between the primary notes. This exact technique is what top producers consistently use to make their trap hi hat rolls sound organic, human and emotionally engaging rather than cold and mechanical.
How to Control the Speed of Hi Hat Rolls in FL Studio
Speed control begins with your BPM control settings inside FL Studio. A faster BPM makes your rolls feel more intense, urgent and aggressive. A slower BPM gives them more breathing room, space and groove. But BPM alone doesn’t define roll speed — your note values do the heavy lifting. At 140 BPM, a 1/32 roll feels very different from a 1/64 roll played at the exact same tempo. Understanding this fundamental relationship is absolutely key to mastering FL Studio beat making at a truly professional level that can compete with major label releases.
Triplet hi hats are another powerful and widely used speed tool inside FL Studio. Triplets divide the beat into three equal parts instead of two — creating an off-kilter, rushing feel that sounds incredible in trap and drill productions. To create triplets, set your snap to 1/24 or use the dedicated triplet option inside the Piano Roll grid settings. Many producers completely overlook this option but it’s genuinely one of the most effective ways to add complexity, movement and personality to your hi hat pattern FL Studio without making it sound cluttered, messy or overcrowded in the mix.
How to Humanize Your Hi Hat Rolls for a Natural Sound
Perfect rolls actually sound robotic — and that’s a fact most beginners don’t realize until they hear the difference. When every note sits exactly on the grid with identical velocity values, the result sounds mechanical and cold. The best producers in the world intentionally break the grid in small, subtle ways. FL Studio has a built-in humanize tool inside the Piano Roll that slightly randomizes note placement and velocity automatically. Using this single tool can completely transform your results from sounding like a beginner to sounding like a seasoned professional producer with years of experience.
Swing settings FL Studio take humanization to an entirely different level of sophistication. Swing pushes certain notes slightly behind the beat — creating a laid-back, bouncy and deeply groovy feel that listeners respond to emotionally. Navigate to the Channel Settings panel and locate the Time Shift knob to add swing to individual channel hits. Combine swing with carefully placed ghost notes and slightly randomized velocity curves and your rolls will genuinely feel like a talented live drummer recorded them in a real studio. Top US trap producers like Metro Boomin and Southside have built entire careers on this exact principle of intentional imperfection and human feel inside their programming.
Common Mistakes When Doing Hi Hat Rolls in FL Studio
The single biggest mistake beginners consistently make is overusing rolls throughout their entire track. Placing a roll in every single bar completely destroys your track’s dynamic range and makes the whole production feel exhausting to listen to. Rolls work best when deployed strategically at key moments — right before a drop, at the very end of a musical phrase, or during an important transition between sections. Think of rolls as seasoning in cooking. A small, well-placed amount elevates everything around it. Too much and it ruins the entire dish beyond saving.
Ignoring hi hat automation is another extremely common and costly error that holds many producers back. Without automation, your rolls stay completely flat and static throughout the entire track — and that repetition becomes boring and predictable very quickly to any listener. Using wrong note length FL Studio settings causes sloppy, blurred and indistinct rolls that lack punch and clarity. Keep your notes short and clean at all times. Always shape your velocities carefully using velocity editing tools. Even small, subtle velocity changes create an enormous perceptible difference between an amateur beat and a radio-ready professional production.
Pro Tips to Make Your Hi Hat Rolls Sound Better
Hi hat layering is one of the single most powerful and transformative tricks available inside FL Studio. Stack two completely different hi hat samples directly on top of each other — one dry and punchy, one bright or metallic in character. Pan them slightly differently in the stereo field and add subtle timing offsets between the two layers. This technique creates a wider, richer and more complex sound without requiring any heavy processing or expensive plugins. Stereo width FL Studio tools like the native Fruity Stereo Shaper plugin can push your carefully layered hats even wider — making them sit beautifully and professionally in any modern trap, drill or hip-hop mix.
Pitch automation adds serious, undeniable energy to your rolls during key moments. As your roll builds toward an incoming drop, automate the pitch gently upward — even just 3 to 7 cents of movement creates noticeable tension and emotional anticipation. Use volume automation FL Studio to naturally swell the roll volume during build-up sections before a drop. Add a reverb send FL Studio using a short plate reverb setting for subtle space and dimension. Apply transient shaping techniques to sharpen the initial attack of each hit so rolls cut cleanly and clearly through even the densest, most layered mix. Combine parallel compression techniques with light hi hat stutter effect patterns and a tight ratchet pattern FL Studio approach for that signature trap beat FL Studio sound energy that consistently dominates modern hip hop drum patterns across every major streaming platform today.
| Pro Technique | FL Studio Tool | Result |
| Hi hat layering | Multiple channels | Richer, wider sound |
| Pitch automation | Automation clip | Builds tension naturally |
| Swing humanization | Time Shift knob | Natural organic groove |
| Velocity shaping | Velocity editor | Human emotional feel |
| Reverb send | Fruity Reverb 2 | Adds depth and space |
| Stereo width | Fruity Stereo Shaper | Wider professional mix |
| Parallel compression | Mixer insert | Thicker, fuller sustain |
| Transient shaping | Fruity Peak Controller | Sharper cleaner attack |
Frequently Asked Questions
What is the easiest way to make hi hat rolls in FL Studio?
The Step Sequencer method is the fastest and easiest starting point. Right-click any step button, change the beat division to 1/32 or 1/64, activate multiple steps in a row and your roll is instantly ready to hear and adjust.
What note value should I use for trap hi hat rolls?
Most trap producers use 1/32 notes for standard rolls and 1/64 notes for faster, more intense fills. Start with 1/32 and experiment from there based on the energy and tempo of your specific beat.
How do I make my hi hat rolls sound more human and less robotic?
Use FL Studio’s built-in humanize tool inside the Piano Roll. Also shape your velocity values so they aren’t perfectly uniform. Adding subtle swing using the Time Shift knob in Channel Settings makes an enormous difference to the natural feel of your rolls.
How many hi hat rolls should I put in one beat?
Use rolls sparingly and strategically. Place them at the end of phrases, before drops or during transitions. Overusing rolls in every single bar kills your track’s dynamic range and makes the production feel exhausting and repetitive to listeners.
Can I automate hi hat rolls in FL Studio?
Absolutely. You can automate volume, pitch, reverb send amount, filter cutoff and many other parameters across any roll inside FL Studio. Automation is what separates flat, static beats from professional, dynamic and emotionally engaging productions.
What is the best BPM for trap hi hat rolls?
Most trap beats run between 130 and 145 BPM. At these tempos, 1/32 and 1/64 rolls feel natural and hit with the right energy. However, the note value you choose matters more than BPM alone when it comes to the actual speed and feel of your rolls.
Do I need expensive plugins to make good hi hat rolls in FL Studio?
Not at all. Everything covered in this guide uses only FL Studio’s native built-in tools. The Piano Roll, Step Sequencer, velocity editor, Fruity Reverb 2 and Fruity Stereo Shaper are all included completely free with your FL Studio license.
Conclusion
Learning how to do hi hat rolls in FL Studio is one of the best investments you can make as a developing music producer. You now have a complete, detailed understanding of three proven methods — the Piano Roll approach, the Step Sequencer workflow and the velocity shaping technique. You understand how to control roll speed using BPM control and note values. You know how to humanize rolls using swing settings FL Studio and ghost notes. You know the common mistakes to avoid and the professional techniques that separate good beats from great ones. Every legendary beat starts with a strong rhythmic foundation — and tight, well-crafted hi hat rolls are a massive part of building that foundation properly. Open FL Studio right now and start rolling. Your best beat is genuinely waiting to be made.